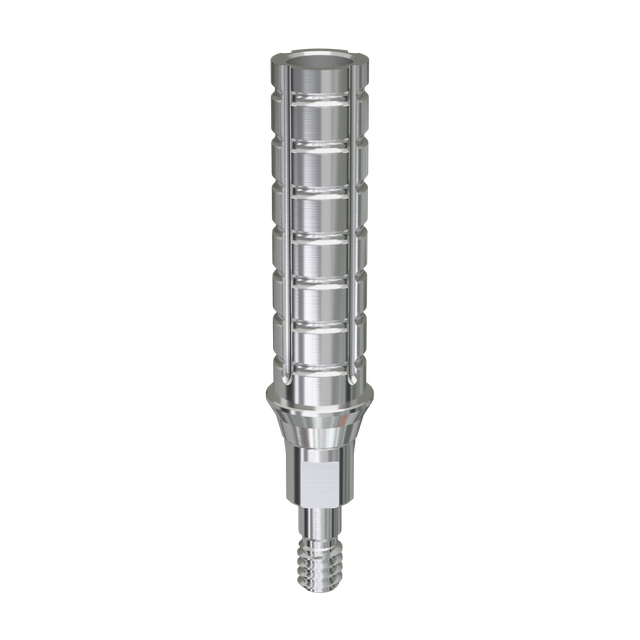
The clinical shift toward immediate implant loading is accelerating rapidly as patients increasingly demand immediate esthetics and function. Avoiding the psychological impact of toothlessness and the physical discomfort of transitional removable prostheses like flippers drives this demand. Meeting these expectations requires precise surgical execution and flawless prosthetic management. Achieving predictable osseointegration while simultaneously developing an ideal soft tissue emergence profile presents a significant clinical challenge. Immediate loading introduces the risk of micromotion at the bone-to-implant interface. If this prosthetic interface is not managed correctly, micromotion exceeding the physiological threshold leads to fibrous encapsulation and ultimate implant failure. Clinicians must control occlusal forces while guiding delicate tissue healing. The solution relies heavily on the Temporary Abutment. This component serves as the fundamental mechanical and biological interface in immediate provisionalization. Selecting the correct abutment material, connection type, and loading protocol mitigates surgical risk, manages functional forces effectively, and ensures predictable definitive restorations.
Key Takeaways
Primary Function: A temporary abutment secures the provisional restoration to the implant fixture, acting as a scaffold to guide gingival maturation and preserve papillary architecture during the critical 3- to 6-month healing phase.
Stability Thresholds: Immediate loading on a temporary abutment is strictly contraindicated unless primary stability metrics (e.g., >35 Ncm insertion torque or ISQ >70) are definitively achieved at surgery.
Material Trade-offs: Titanium temporary abutments offer superior fracture resistance and biocompatibility for posterior or high-load areas, while PEEK/plastic options provide chairside modification flexibility for anterior esthetics.
Risk Mitigation: Success relies on absolute control of occlusal forces; provisional restorations on temporary abutments must typically be kept out of centric and eccentric occlusion to prevent micromotion exceeding the 100–150 micron threshold.
Defining the Temporary Abutment in Implant Dentistry
The Temporary Abutment plays a vital anatomical role in modern implantology. It functions as the transmucosal connection between the endosseous implant and the provisional crown. This component supports the surrounding gingival tissues immediately after surgery, preventing soft tissue collapse and guiding the formation of the emergence profile. By acting as a rigid scaffold, it allows the clinician to sculpt the peri-implant mucosa during the critical initial healing phase, setting the stage for a highly esthetic definitive restoration.
Understanding exact timing definitions in implantology dictates treatment planning and patient communication. Clinicians categorize loading protocols based on the time elapsed since implant placement. Immediate loading involves the attachment of the provisional restoration on a temporary abutment within 48 to 72 hours of implant placement, often completed on the same day. Early loading refers to restoring the implant between 48 hours and 3 months, after initial soft tissue healing but before full osseointegration. Delayed or conventional loading involves restoring the implant after a full healing phase of 3 to 6 months, typically using standard healing abutments prior to provisionalization.
Loading Protocol
Timeframe
Clinical Application & Biological Status
Immediate Loading
0 to 72 hours
Requires high primary stability (>35 Ncm). Provisional is kept out of occlusion. Bone is in the initial inflammatory phase.
Early Loading
48 hours to 3 months
Utilized when primary stability is moderate. Bone is undergoing active remodeling and woven bone formation.
Conventional Loading
3 to 6 months
Standard protocol for grafted sites or low initial stability. Lamellar bone has formed, ensuring secondary stability.
The "One Abutment, One Time" concept represents a major biological shift in implant prosthetics. Minimizing abutment disconnections preserves the delicate mucosal barrier. Repeated removal of healing abutments disrupts the hemidesmosomal attachment and the connective tissue zone. This mechanical disruption causes marginal bone loss and apical migration of the junctional epithelium. Placing a provisional abutment at the time of surgery and leaving it undisturbed optimizes tissue stability, reduces crestal bone remodeling, and maintains the natural scalloped architecture of the gingiva.
Clinical Indications and Success Criteria for Immediate Loading
Objective measurement of primary stability dictates the feasibility of immediate loading. You cannot bypass these non-negotiable prerequisites without risking catastrophic failure. Insertion torque values must exceed 35 Ncm, demonstrating mechanical friction between the implant threads and the osteotomy walls. Resonance Frequency Analysis (RFA) should yield an Implant Stability Quotient (ISQ) greater than 70. Falling below these metrics requires abandoning immediate loading and reverting to a conventional healing protocol.
Patient selection requires rigorous evaluation of systemic and local factors. You must assess bone density, categorizing it from Type I (dense cortical) to Type IV (soft medullary). Dense bone supports immediate loading better than soft medullary bone, which often requires under-preparation of the osteotomy to achieve adequate torque. You must rule out active parafunctional habits like severe bruxism or clenching. Favorable occlusal schemes are mandatory to prevent off-axis loading, which amplifies stress at the crestal bone level.
Surgical site evaluation impacts the loading decision directly. Examine the extraction socket morphology carefully to determine if the implant can engage native bone beyond the apex. Determine the necessity of simultaneous guided bone regeneration (GBR). Extensive GBR, especially involving vertical augmentation or large buccal defects, often contraindicates immediate loading due to the risk of graft micromotion. Evaluate the tissue biotype. Thick biotypes resist recession and mask underlying restorative materials better than thin biotypes during the provisional phase.
Psychological and aesthetic indications strongly favor immediate provisionalization in the aesthetic zone. Patients experience severe anxiety associated with physical tooth loss, particularly in the anterior maxilla. Temporary removable appliances, such as acrylic partial dentures, often exacerbate this distress by altering speech and mastication. A fixed provisional restoration eliminates this anxiety, restores immediate confidence, and protects the surgical site from the trauma of a removable appliance resting on the healing tissues.
Material Selection: Evaluating Temporary Abutment Types
Engaging vs. Non-Engaging Connections
You must differentiate the mechanical applications of abutment connections based on the restorative plan. Engaging abutments feature anti-rotational elements, such as internal hexes or conical connections with indexing. You use these for single-unit immediate provisionals to prevent crown rotation under functional forces. Non-engaging abutments lack these anti-rotational features. You use them for multi-unit, splinted immediate loading scenarios, such as full-arch rehabilitations. They facilitate a passive path of insertion across divergent implants and distribute occlusal load evenly across multiple fixtures.
Titanium Temporary Abutments
Titanium offers high tensile strength and optimal soft tissue adherence. It is the material of choice for immediate loading where maximum rigidity is required. You need this strength to splint implants effectively in full-arch cases. Titanium withstands incidental masticatory forces in high-stress posterior zones without fracturing. It provides a highly stable platform for luting acrylic or composite resin, ensuring the provisional restoration remains intact throughout the healing phase.
PEEK (Polyether Ether Ketone) and Plastic Abutments
PEEK and plastic options highlight the ease of chairside preparation and modification. They offer excellent scalability for your workflow, allowing rapid adjustment with standard acrylic burs. You must weigh the trade-offs carefully. They possess lower fracture resistance compared to titanium, making them less suitable for posterior single units in heavy bruxers. However, they provide an excellent esthetic baseline. You avoid gray metal show-through under thin gingival biotypes, which is critical in the anterior zone. They offer sufficient durability for the standard 3-6 month provisional phase when occlusal forces are properly managed.
Material
Primary Advantage
Primary Limitation
Best Clinical Application
Titanium
Maximum strength and rigidity
Gray color can show through thin tissue
Posterior single units, full-arch splinting
PEEK
Excellent esthetics, easy to modify
Lower fracture resistance than metal
Anterior single units, thick biotypes
PMMA/Plastic
Low cost, rapid chairside adjustment
Prone to wear and fracture over long term
Short-term anterior provisionals
Soft Tissue Management and Emergence Profile Development
Sculpting the Peri-Implant Mucosa
The subgingival contour of the temporary abutment supports the free gingival margin and the interdental papillae. You must execute this clinical step precisely to achieve a natural esthetic outcome. The provisional crown acts as a matrix, guiding the healing tissue into a natural scalloped architecture. Poor contouring leads to blunted papillae, unesthetic margins, and food impaction. The goal is to mimic the cementoenamel junction of the natural tooth being replaced.
Critical vs. Subcritical Contours
You must master the biological concepts of critical and subcritical contours to manipulate soft tissue predictably. The critical contour is the coronal-most portion of the subgingival profile, located 1-2 mm apical to the free gingival margin. The subcritical contour is the apical portion below the critical zone, extending to the implant platform. Adjusting the critical contour dictates the mucosal margin level. Adding bulk creates a coronal push, moving the tissue apically. Reducing bulk allows coronal migration of the tissue. The subcritical contour provides running room for the tissue; a concave subcritical contour allows for greater soft tissue volume and thicker biotype development.
Transitioning from Provisional to Definitive
Workflow efficiency depends on capturing the custom emergence profile accurately once the tissue has matured. You create this profile using the provisional abutment over several months. You must capture it using a customized impression coping. This involves removing the provisional, attaching an impression coping, and flowing flowable composite around it to replicate the exact subgingival shape of the provisional crown. This ensures the definitive laboratory abutment perfectly replicates the healed tissue architecture. Failure to transfer this profile results in tissue blanching, patient discomfort, and potential recession upon final delivery.
Step-by-Step Implementation: The Immediate Loading Workflow
Chairside Modification vs. Lab-Fabricated Provisionals
Understand the implementation realities of different fabrication techniques. The direct technique involves relining a pre-formed polycarbonate shell or bis-acryl resin directly onto the abutment chairside. This offers speed, immediate delivery, and eliminates laboratory turnaround time. The indirect technique utilizes digital scanning, CAD/CAM design, and lab fabrication. This provides superior material properties, precise occlusion, and better polishability but requires more time, coordination, and often a second appointment within the 72-hour window.
Detailed Step-by-Step Protocol for Direct Chairside Fabrication
Abutment Seating: Place the engaging titanium or PEEK abutment onto the implant fixture immediately following extraction and placement. Verify complete seating radiographically.
Protection: Place Teflon tape or a protective silicone sleeve over the screw channel. This prevents access of composite or acrylic resin into the screw head, which would complicate retrieval.
Shell Preparation: Adjust and vent a pre-formed provisional shell or vacuum-formed template matrix to fit passively over the abutment without impinging on the soft tissue.
Luting: Apply flowable composite or bis-acryl resin to lute the provisional shell to the abutment. Ensure the material flows evenly around the abutment to capture the internal anatomy.
Removal & Refining: Once the material reaches its initial set, unscrew the assembly. Fill any voids extraorally. Highly polish the subgingival transition zone using rubber points and polishing paste to prevent plaque accumulation.
Torque and Occlusal Adjustment: Reseat the assembly. Torque to the manufacturer's provisional specification. Thoroughly clear all occlusal contacts in centric and excursive movements.
Screw-Retained vs. Cement-Retained Provisionalization
Compliance and safety dictate your retention choice. Strongly advocate for screw-retained provisionals whenever the trajectory allows. This approach eliminates the risk of residual subgingival cement. Retained cement is a primary catalyst for peri-implantitis, leading to rapid bone loss and implant failure. Screw retention allows easy, non-destructive retrieval for tissue evaluation, contour modification, and final impression taking during the healing phase.
Torque Specifications and Seating
Technical detail matters during seating to protect the integrating implant. Specify standard torque protocols for provisional abutments. They are often hand-tightened or torqued to 15-20 Ncm. You must avoid disrupting the integrating fixture during the healing phase. Over-torquing can break the initial bone-to-implant contact, leading to fibrous encapsulation. Always verify complete seating with a periapical radiograph before final torquing to ensure no soft tissue or bone debris is trapped in the connection.
Risk Management and Complication Mitigation
Controlling Micromotion and Occlusal Overload
Implementation risks center on the biomechanical threshold of osseointegration. Micromotion must remain below 100-150 microns to allow osteoblasts to lay down woven bone. Detail strategies for adjusting the provisional crown. Ensure non-functional loading for single units. You must clear all centric, eccentric, and excursive contacts using articulating paper. Absolute disocclusion is mandatory to prevent implant failure. Instruct the patient to adhere to a strict soft diet for the first 6 to 8 weeks.
Managing Provisional Fracture or Loosening
Outline mitigation strategies for managing a loose abutment or fractured provisional. You must address this immediately without compromising the integrating implant. Remove the provisional carefully. Clean the internal connection of the implant with chlorhexidine. Retorque the abutment to the provisional specification. If the provisional is fractured, repair it extraorally. Emphasize the importance of patient compliance. Strict soft-diet restrictions and avoidance of incision with the provisional are essential to prevent recurrent loosening or fracture.
The Fallback Protocol: When to Abort Immediate Loading
Define the exact clinical scenarios where you must abandon immediate loading to protect the patient and the implant. Unexpected fenestrations or dehiscences require simultaneous grafting, not loading. Severe buccal plate resorption compromises stability and esthetics. Failure to reach 30-35 Ncm torque or an ISQ below 60 mandates a change in plan. In these cases, abandon the provisional approach. Place a low-profile healing cover screw, achieve primary closure if necessary, and utilize a delayed loading protocol to ensure predictable osseointegration.
Conclusion
Managing the mechanical and biological complexities of temporary prosthetic connections requires high-quality, reliable structural components that simplify the clinical workflow. As a premier provider of integrated digital dentistry systems, KETAI is dedicated to supplying clinicians with world-class, precision-engineered implant accessories and CAD/CAM restorative solutions that streamline immediate provisionalization and maximize soft-tissue stability. By implementing the strict screening and adjustments outlined below, practices can predictably deliver exceptional patient care.
Audit your current implant system's temporary abutment portfolio to ensure you have both titanium and PEEK options readily available for different clinical scenarios.
Standardize your primary stability measurement protocols by adopting ISQ devices for objective, repeatable data collection during surgery.
Align with your dental laboratory on custom impression techniques to accurately transfer healed emergence profiles, ensuring the definitive restoration supports the sculpted tissue.
Implement strict occlusal adjustment checklists to guarantee absolute disocclusion on all immediate single-unit provisionals before the patient leaves the chair.
FAQ
Q: What is the difference between a healing abutment and a temporary abutment?
A: A healing abutment simply guides soft tissue healing and maintains transmucosal access to the implant platform. A temporary abutment provides a rigid mechanical foundation to attach and support a provisional crown while actively guiding the custom emergence profile.
Q: How long does a temporary abutment stay attached to the implant?
A: It typically remains attached for 3 to 6 months. This duration covers the entire osseointegration and soft tissue maturation phase before being removed and replaced by the definitive final abutment.
Q: What is the minimum insertion torque required to use a temporary abutment for immediate loading?
A: You must achieve a minimum insertion torque of 35 Ncm. Additionally, an ISQ value greater than 70 is highly recommended to ensure adequate primary stability and resist micromotion.
Q: Should temporary abutments be screw-retained or cement-retained?
A: They should almost always be screw-retained. This eliminates the risk of residual subgingival cement, which can cause severe peri-implant inflammation, rapid bone loss, and eventual implant failure.
Q: Do temporary abutments require engaging or non-engaging connections?
A: Single-unit restorations require engaging connections to prevent rotation under functional forces. Multi-unit splinted restorations require non-engaging connections to allow a passive path of insertion across divergent implants.
Q: What are critical and subcritical contours on a temporary abutment?
A: The critical contour is the coronal portion that dictates the gingival margin level and zenith. The subcritical contour is the deeper apical portion that provides space for tissue volume and connective tissue attachment.